February 2025
Following the excellent results of the telecom laser stabilization on La2+ lines, I have attempted to do the same using Ba+ ions, which require worse lasers (due to the unavailability of DFB-like devices and other robust and cost-effective components at the required wavelengths) but scatter way more photons and at visible wavelengths convenient for detection - in fact 493nm is close to the peak sensitivity of the human eye, so under the right conditions you can see trapped ions directly without a potentially expensive camera. Barium was chosen over calcium because previous experiments with laser diodes have shown that free-running 493nm diodes are easier to control than 397nm ones, in addition to the poor visibility of 397nm light which would require a camera for detection in an ion trap. Strontium had not been considered previously because 422nm diodes were strictly quantum gravy train devices, but this has changed since SHARP GH04I01A2G diodes are now widely available at reasonable prices - but this will be for another time.
The 493nm laser was built with the diode used previously, but with a simplified mount since the experiment had shown that it only needed to be cooled to about 3.6C. A single-stage TEC without liquid cooling is more than sufficient for this purpose. The top part of the previous mount was used with two TEC1-04901K28 Peltier coolers wired in parallel. This parallel combination of two TEC1-04901K28 was chosen because it provides an impedance that is well matched to the capabilities of Kirdy's TEC driver (in addition to mechanical compatibility with the copper diode mount).
For the 650nm "repump" laser, I have used a diode extracted from the optical unit of an unknown DVD burner, part of a box of DVD drive optical units I had found in the trash years ago. I am aware that using a random diode from the trash makes this experiment about as reproducible as the average Nature paper, except of course that the latter would have used something additionally expensive and export-controlled, but for red diodes you can find a lot of information from holographers with usable part numbers. The diodes that are good for holography should work just as well here, if not better. The diode had a room temperature wavelength of about 657nm, which did not seem encouraging at first, but compared to the 493nm diode the temperature sensitivity is higher and it does not seem that the wavelength quickly reaches a plateau as the diode is cooled down. So it turned out to be possible to reach 650nm by cooling the diode to about -20C, which still can be done with a single-stage TEC. No costly wavelength selection required, in fact a $0 diode works!
To check the detailed spectrum of red diodes, the holographic grating with 3600 lines/mm used previously cannot work, as such gratings stop functioning above ~535nm. Another grating (Thorlabs GH13-24V) with 2400 lines/mm was used instead.
The diode's copper mount was simplified for this laser (design file), and it was cooled with a single Same Sky CP20151 TEC.
Here is a quick-and-dirty method to check if a random diode can reach the desired wavelength with a reasonable amount of cooling: Take a transparent container with high walls, for example a (dry) water bottle made of clear plastic, and put the bare diode at the bottom. Run the diode just above threshold and monitor the wavelength with a grating spectrometer outside the container. It is important to keep the current as low as possible so that the diode does not produce too much heat and also because the subsequent cooling will produce a power spike that could otherwise kill the diode. Fill the container with gas from a duster can (for example one based on the R-134a refrigerant) - the gas is much heavier than air so it will tend to stay in the container; it is also dry and will prevent condensation on the diode. Invert the duster can so it expels liquid refrigerant and spray the back of the diode, being careful not to contaminate the front. If you get the diode dirty, you should be able to clean it using First Contact Polymer, though that may be difficult with windowless models. Monitor the wavelength change on the spectrometer and check if the wavelength goes low enough. Wait until the diode has returned to room temperature before taking it out of the container with dry gas.
I have experimented with putting the diodes in vacuum (which provides excellent thermal isolation in addition to eliminating condensation) instead of just dry air, with mixed results. We are talking here about low vacuum in the 0.01mbar - 1mbar range, which is annoying enough already. Sealing was done using Apiezon Wax W, and a small and inexpensive electrical feedthrough was built using a custom FR4 PCB (PCBWay) with a 2.54mm pin header soldered through. Pumping was done through inexpensive refrigeration access valves attached to IP68 die-cast aluminum enclosures used as makeshift vacuum chambers. Depending on the phase of the moon, you may get a few days of usable vacuum from this hack after it has been pumped down. To check the vacuum level, small 12V incandescent car light bulbs with a hole made using sandpaper can work as miniature and cheap Pirani gauges that are easily mounted inside the box. Thermistors also work somewhat, but the sensitivity is poor due to the lower operating temperatures and higher heat conduction through their leads.
I suspect the leaks come from the enclosure's gasket which was not designed to hold vacuum; more experimentation is required to find out, maybe with a RGA/helium leak detector so I don't have to do so much trial-and-error with long iteration cycles. I may just come back to silica gel eventually, which is far more forgiving.
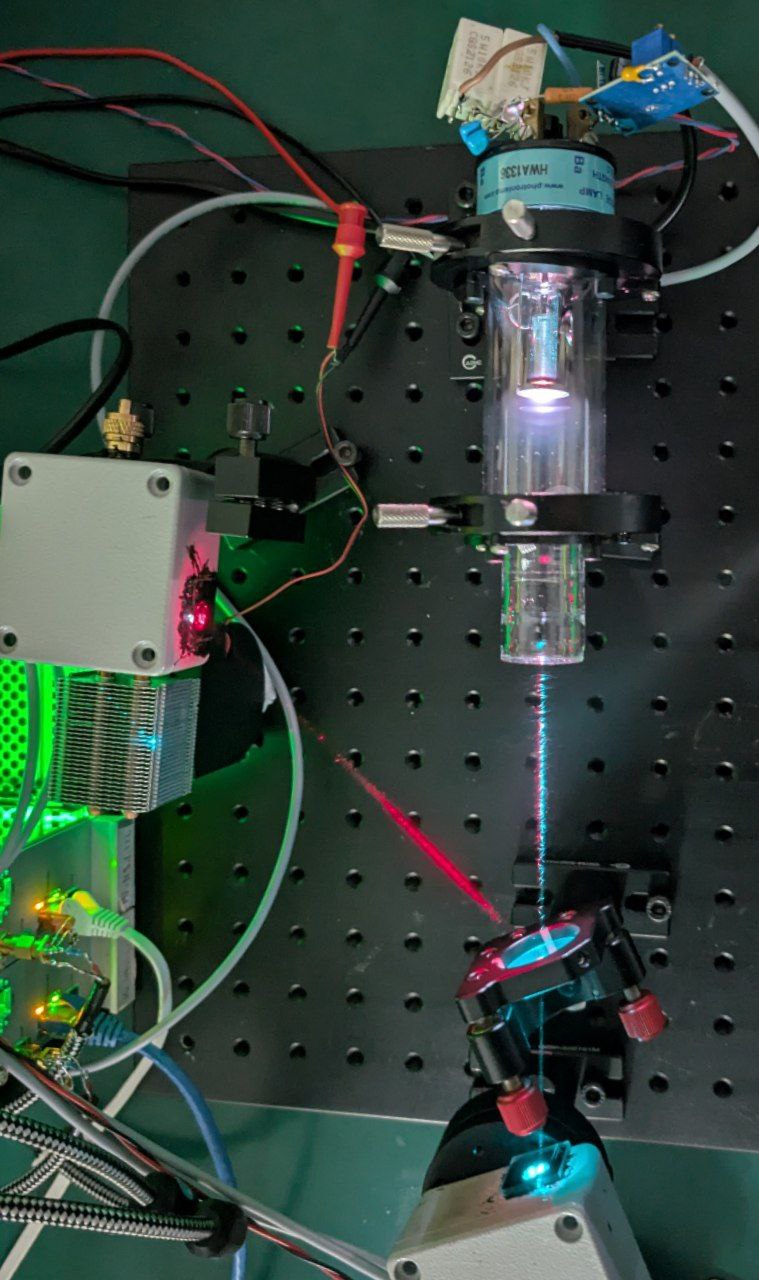
The beams from the two lasers were combined with a dichroic mirror (Shenyang Ebetter Optics), resulting in a pretty white/pink beam, and sent into a hollow cathode lamp (picture).
A problem with the 493nm light is that it causes substantial photocurrent in the barium lamp, as the photon energy is higher than the barium's work function. That current can be detected when the lamp is not ignited, and by applying a voltage just below the striking point, you can even ignite the lamp using the photoelectrons set loose by the laser. Because the laser frequency modulation through the diode current also causes amplitude modulation, the photocurrent will cause a signal to be always detected at the fundamental lock-in frequency. Thankfully, this signal is low-noise and stable over a sufficient range of laser diode temperatures, so it can be just calibrated out in software by taking the baseline level near (but not on) the spectral line of interest. This is what the "RAM cancellation" feature in Soundlocker does. Alternatively, using harmonic demodulation also gets rid of the photocurrent - unlike a spectral line frequency sweep, the photoelectric response is very linear and does not create any harmonic content. However, the resulting signal/noise ratio (SNR) is lower when using one harmonic compared to calibrating out the photocurrent in the fundamental. In a future version of Soundlocker, it may be interesting to try combining the signals from several harmonics (for example using principal component analysis) in order to improve the final SNR of a synthetic spectroscopy signal.
The 650nm light with its less energetic photons does not cause a photocurrent, and RAM cancellation is not necessary for this second laser.
Just like the 650nm laser is more sensitive to temperature changes, it also has a higher current tuning coefficient. Only about 5% of the current modulation applied to the 493nm laser should be applied to the 650nm laser to produce a similar FM scan of the spectral lines. The 650nm diode does not seem very prone to mode partition noise and so a few weak additional modes may not be a serious problem - they seem to only cause weaker "ghost" spectral lines which are not an issue as long as you can still correctly guess what is going on. The 493nm diode on the other hand is often noisy when two modes are present, but it has larger single-mode operating regions than the 650nm diode.
I have tried two different hollow cathode lamps in this experiment, a Photron P804A argon-filled lamp and a Chinese neon-filled lamp. They offer similar performance so you might as well go for the Chinese lamps which are several times cheaper. The main difference is the neon-filled lamps exhibit additional spectral lines from the buffer gas, but they are far enough from the barium lines that they can be told apart using a low-cost grating spectrometer - and they can actually be useful for fiducial purposes and to check that your setup is working at all (the neon lines are more intense than the barium ones). A pathology I observed in the Chinese lamp is some instability that caused the lamp to produce massive amounts of noise for dozens of seconds at a time at seemingly random times, but this behavior went away after the lamp had been operated for several hours.
With these details sorted out and by adjusting the diode currents to get stable and mostly single-frequency output near the Ba II spectral lines, the setup works basically the same as the La III proof-of-concept. With both lasers locked to the lamp, it should be possible to observe the fluorescence of small numbers of individual barium ions in a trap, and maybe even perform Doppler cooling by fiddling with the servo setpoint and modulation depth of the 493nm laser.
This work was presented at a seminar at the University of Oxford (local copy). Download the slides here.